CNC routers need cutters – or bits if you prefer. The type of bit you choose for a job needs to meet the requirements of that job. When the job needs to cut through the material, especially laminated material and needs to show sharp edges on both sides, the compression bit is by far the best choice.
Choosing the correct router bit will help you produce a flawless part with fine resolution and will determine how fast your machine can move through the material. They come cutting edges that will shear straight on, shear up, shear down, and some shear both up and down. The shapes router bit come in are endless, but I am writing about straight, end mills and a special kind called a compression bit.
What is a compression bit?
A compression bit is a combination of an up shear and a down shear bit. The very end of the bit (furthest away from the router) will have up-cutting flutes. The remainder of the bit will have down-cutting shear flutes. This distributes the shearing action in opposite directions on the 2 sides of the material.
A Compression bit can be used in a handheld router, table-mounted router, or CNC router. For handheld routers and table-mounted routers, compression bits are available with bearings for pattern-cutting applications. I will address mostly the CNC router applications.
When a compression bit is used in a handheld router, it is recommended to use a fence, bearing, or bushing to guide the tool. running any type of spiral bit without the following something to control the movement will make your day very sad.
With the combination of cutting spirals, the bottom of the bit acts as an up-cut bit to preserve the edge on the bottom of the workpiece. By applying an upward cutting shear, the edge is preserved.
The top of the workpiece is sheared downward with the down-cutting part of the bit. Again, this preserves the edge on the top of the material. Even laminated material benefits from this combination.
Even if you want to risk cutting the top half of your workpiece with a down cut bit and changing bits to finish with an up-cut but, the latter just might pull the edge up causing fraying or delamination. For this reason, the compression bit is a valuable bit to have at your disposal. Especially if you are cutting plywood for finished cabinetry.
When Should I Use a Compression Bit?
Any time that you want to produce a product from laminated sheet goods that is a step above the competition, you might consider using a compression bit. The compression bit can be effectively used on hardwoods as well as any laminated product like plywood. If a clean edge on both sides of your sheet good is important to you, consider the benefits of a compression bit.
Some shelves will have a facing clued to the edge giving it a crisp, clean edge. Even if these shelves were cut on a table saw, the frayed edges will exist at the glue line on at least one side. One option is to cut the shelves out on a CNC router using a compression bit. This way, both the top and bottom edges will be clean, and the facing glue joint will be less likely to show.
What is the best way to use a Compression Bit?
While compression bits are the tool to use when cutting double-sided laminates, it does no good unless you use the tool correctly. Remember, the end of the bit has up shear flutes that will tear at the top surface as it is plunged into the wood. A few tips will minimize the damage caused by the initial contact with the workpiece.
- A compression bit is most usefull when mounted in a CNC router.
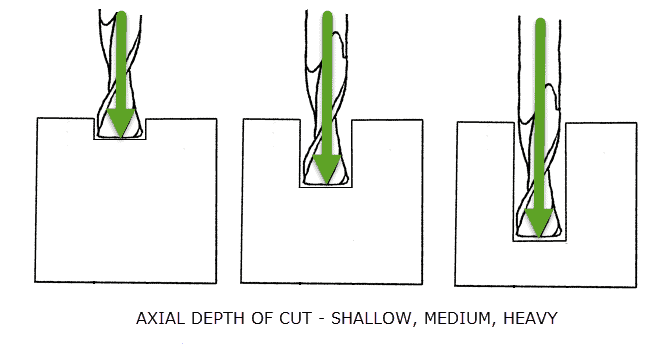
- Your first cutting path will have to be deeper than the depth of the up-cut portion of the compression bit.
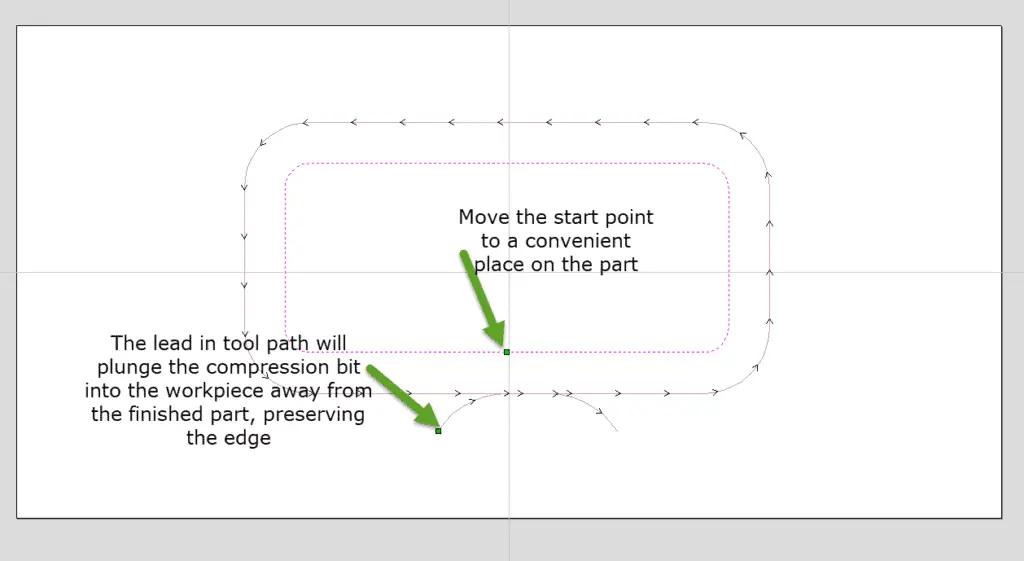
- The cutting paths that are defined with a lead-in will contact the workpiece away from the finished edge ensuring that the finished part will have perfect edges.
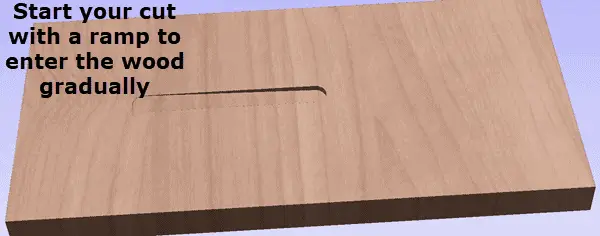
- Ramping the bit into the wood will increase the tool life by reducing heat caused by a straight plunge cut. This action also allows the chips to clear out of the cut path.
- If you do not have the capability to define either ramps or leads, you might consider cutting with an offset then run a final full depth finish path.
Plunge: A vertical Z movement directly into the material.
Ramp: While the tool is driving into the material, it is also moving forward along the programmed path.
Lead In: Starting the cut away from the finished edge then moving the tool to the correct position laterally.
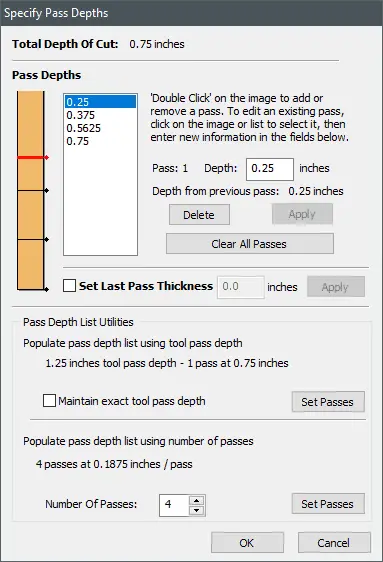
Pass Depth: When running on a CNC machine, it is important to set your first depth pass height to be larger than your Upcut Height. If your machine is not sturdy enough to cut through the entire workpiece in 1 pass, you will have to set up multiple passes to work your way through the material. Setting the first cut depth will ensure that the top surface layer is not disrupted. Most CAM programs will allow multiple passes to be set and some will allow specific depth for the first cut.
With table-mounted and handheld applications, remove as much of the waste as possible from the pattern before finishing up with a full-depth shallow cut to the final shape.
What are the important parts of a Compression Bit?
It is important to know the specifications of your compression bit. As with all router bits, probably the most important dimension will be the cut depth or cutting height. The vendor will list this, and you should take note of this dimension for future reference. It is recommended to use the shortest bit that will get the job done to eliminate chatter, so it is not inconceivable to have several compression bits in your tool chest.
The other important dimension to know about your compression bit will be the up-cut length at the end of the bit. This can be as little as 1/8 inch up to half the cutting height. You need to know this so you can ramp down to at least that depth on your toolpath lead-in to avoid tear-out on your part.
Shank diameter and cutting diameter are also important things to know about any bit you have.
Are There Disadvantages to a Compression Bit?
- With all the advantages of owning a compression bit, one disadvantage would be the cost. A good compression bit might cost 25% to 50% more than a comparable spiral bit. Then again, a good spiral bit costs more than a straight flute bit. In both cases, it is worth the cost to produce the next level of a quality product.
- If you do not set the first pass deep enough, the up-cut portion of the bit will tear up the edge as would any other up-cut spiral bit. Care must be taken when setting up the compression bit on a CNC router.
- Many hobbyist CNC router tables do not have the power to plow through ¾” sheet goods. This leaves only the option of multiple passes to get through the entire sheet. Some would say to run 2 toolpaths along the same geometry – the first with down-cut spiral bit and the second with an up-cut spiral bit. This method seems to be even a greater disadvantage.
In Conclusion
I recommend using compression spiral bits for all those who are cutting sheet goods such as plywood, melamine, or countertops. The expense is well justified by the cleaner cuts a compression bit will bring to your shop.
