A dado cut is an extremely common woodworking joint that has a wide variety of uses. Although many of its characteristics can be confused for a few other joints, a dado is distinct in a few ways. Beginning to understand this cut and its application is essential for any aspiring woodworker.
A dado is a woodworking joint that is a wide cut across the grain of one piece of wood. Another piece of wood, as thick as the dado is wide, is then inserted into that cut to create the joint. Dado cuts are commonly used in pairs for bookshelves and cabinets thanks to their shearing strength.
The distinction of a dado cut against other common joints is that dado cuts always cut across the grain. Given the number of common household items that use Dado cuts, as well as their abundant usefulness, it is worth taking time to learn more about them.
Other Names for Dado Cuts
Dado cuts are so common that a few different common names have come up for the cut. Most often, these names represent or describe some aspect of the Dado cut, either to make it easier for others to understand or simpler to say.
The two most common alternate names for a dado is “housing” or a “trench”. Both are most often used to describe the initial cut, rather than the fully formed joint.
Both names are really in a simple explanation, coming up naturally after understanding the joint; the initial cut simply looks like a trench, and it ultimately houses another piece of wood.
In a similar vein, it is easy to confuse dado joints with a few other common woodworking joints, especially as a beginner. Some of the most common confusions are groove cuts and rabbet cuts. Although all function as fantastic joints and are often called the three essential grooves to learn, they are each distinct.
Groove cuts are exactly like a dado cut, except they run with the grain. This choice makes more sense in a few scenarios, such as when crafting drawers or when working with some specific cuts of wood.
Rabbet cuts are where the ends of a piece of wood are trimmed away so that it can easily slot into another opening. This requires cutting the piece to be inserted into the joint, unlike most groove or dado cuts. But this short article is to talk about dados.
How Dados Are Made
Dado cuts can be made with a variety of tools, although most people agree that using a router is the quickest and often most accurate way to get the job done.
The most common methods used to create dado cuts are:
- Routers (Handheld or Table mounted)
- Table Saws (with a Dado Stack Blade)
- Dado Plane (link to Lee Valley)
- Chisels and a jig
You can consider this list to be in order of best to worst. Of course, specific situations arise where one method will outshine another, but that is rare.
Routers
Routers are the most often recommended way to craft dados thanks to their increased accuracy, often cheaper cost, and their ability to make a variety of cuts. While slower than some of the other methods, routers simply make the process easier.
To make a dado cut with a router, choose a straight bit or spiral up-cut bit with a diameter that is less than the dado width. Most milled wood and sheet goods thicknesses will not match the diameter of the bit. Therefore, it is best to plan to take 2 cuts when routing a dado.
Moving a router fence to achieve the second cut can be tricky – if not impossible. To help with this 2 cut method, you will need to clamp 2 straight pieces of wood onto the workpiece to define the dado width. If you have access to router bushings, it is best to use a jig that will precisely line up with the dado of any width. For a very good video of an Exact Width dado jig, look at this video from The Wood Whisperer
Table Saws
Using a table saw to cut dados can work extremely efficiently, but often the initial cost and lower usability make it a less appealing option. Table saw kits for cutting dados are often expensive, and your table saw may not even have the capability or length to properly cut dados.
However, for those looking for a quick way to cut a dado without some of the other options, a table saw absolutely can work. Additionally, those who need to cut many dado cuts will enjoy the speed of the process here.
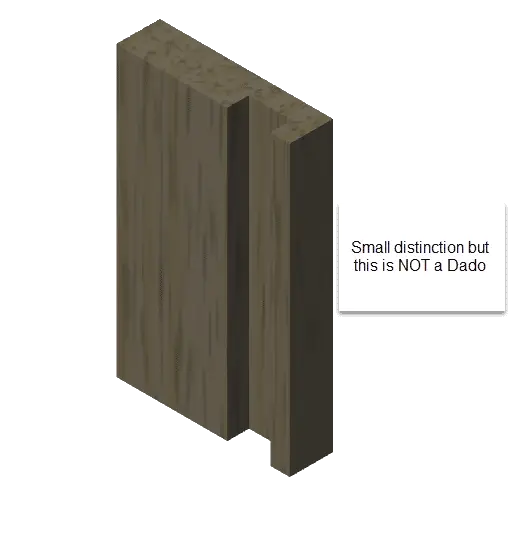
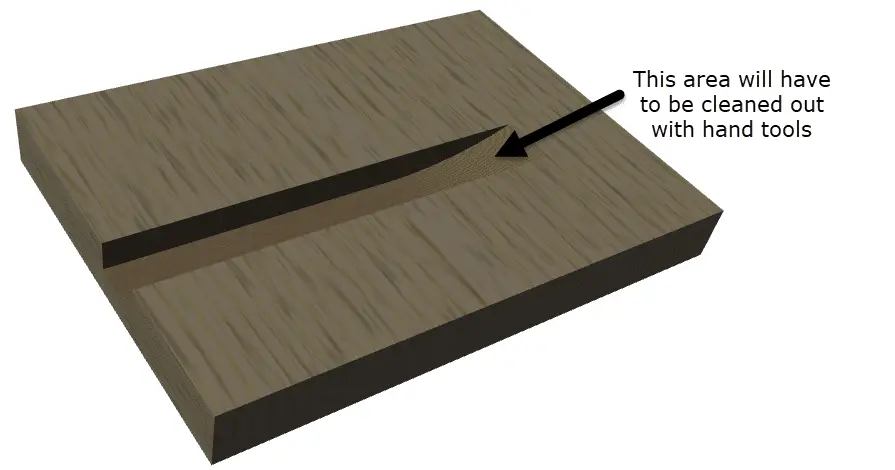
The table saw is not the best option to cut blind dados because of the diameter of the blade not leaving a square cut. If the table saw is your only choice to cut a blind dado, you may have to clean up the end of the cut to square it up.
Dado Plane
Back in the “old days” people did not have table saws or routers. So, how were dados created by the traditional woodworker of yester-year? Simple – they used a plane. Bit not a surfacing plane. They invented a modified surface plane that would reach below the top surface and create a dado.
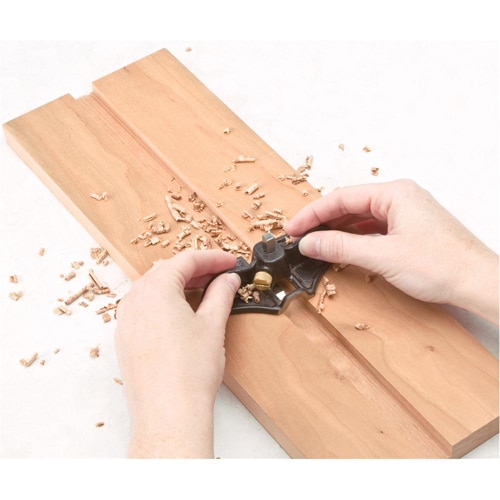
Figure 1: Dado Plane cutting a Groove in the Wood.
Chisels
Outside of power tools, the best option is the simple and classic chisel. Using a chisel to craft a dado cut is easy, although often time-consuming; mark the joint as always, then carefully chip away to your desired depth.
Using chisels to craft a dado cut is the most time-consuming option and, in the age of power tools, rarely chosen for this reason. However, it is good to remember that chisels can help fix mistakes made later on; for instance, if you did not cut the original dado even enough or you were concerned about chip-out in a small section, a chisel can help even out the final product and make the joint stronger. A chisel will also be the tool of choice to square up the end of a blind dado cut on a table saw.
The Strength of Dado Cuts
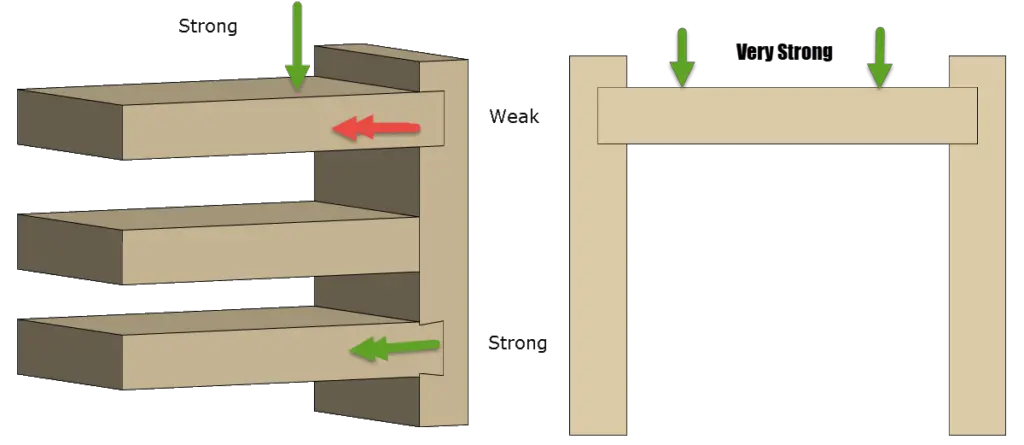
One of the biggest benefits of using a dado joint is the strength it grants your woodworking project. When paired with a dado in a second panel, the whole piece or shelf can withstand much more shearing force. This translates to bookshelves that bend less, drawers that do not bow, and cabinets which can easily hold heavy items.
Dado cuts are so strong in the perpendicular direction that they beat out dowels and require less time. Of course, multiple dado cuts are necessary. Otherwise, the shearing force will just get pushed to the side without the dado cut and weaken the piece that way. When using dado joints, be sure to combine it with a second dado cut for maximum strength.
Sadly, the dado joint is not infallible; it is naturally weak in a parallel direction when forces would pull it. Because the dado joint is only a flat housing cut into a board, no wood on either piece of the joint is supported against pulling. Instead, this falls to the realm of glue, nails, screws, and bolts.
Dado joints can be modified slightly into a sliding dovetail joint to largely fix this weakness, although then it technically stops being a dado joint. Still, it is an effective way to fix this issue while keeping the strength of a dado joint.
What Is A Dado Joint Used For?
Dado joints are one of the most common ways to construct boxes such as cabinets and bookcases. Anytime that the joint is expected to receive shearing (downward) pressure, a dado joint may be used. This largely comes up through a few different builds, which are:
- Bookcases and shelves
- Cabinets
- Box bottoms
All of these share the common similarity that most force is experienced in the perpendicular direction of the joint, rather than the parallel. This works toward the strength of a dado joint rather than against it and is why dado joints are most common on these items.
The use case of dado joints is not limited to these items or other shelves, so be creative! Think critically about what forces will likely act on your woodworking craft and see if a dado joint is a good fit.
Types of Dado Cuts
There are a few different types of dado cuts that do not significantly change its strength but do influence aesthetics or other usability. The two most common types of dado cuts are through dado and stopped dado cuts.
A Through Dado is the simplest form of dado to cut and is defined when the cut passes through the entire piece. As it is the simplest form and does not lose any durability or strength, this is the most common cut. However, it can look disjointed or odd for finished pieces and possibly ruin the look of the piece. The through dado is often hidden behind facing or other elements of the furniture.
Stopped Dados are much more becoming. A stopped cut dado is simply a cut that does not fully extend to both ends of a piece of wood. It is called a stopped dado if one or both ends are left uncut. This gives the effect of a simple butt joint. This is a little more difficult cut to achieve but the aesthetics are likely worth it. It is very common when crafting bookshelves or nice cabinetry to opt for a stop cut so that the finished edge maintains a uniform look.
Using Your Dado Cut
Now that you have a bit more confidence and knowledge, what is your first project going to be that use a dado joint on? Or do you have a favorite way and tool to do it? We would love to hear. Share your thoughts below in the comments!